Microsoft Exchange
Introduction
This guide tells you how to authenticate the Microsoft Exchange connector in Swimlane.
You can authenticate using one of the following methods:
- OAuth 2.0 Client Credentials (Graph Confidential Client)
- NTLM Authentication (Exchange on-premises only)
You will create an Azure application (for OAuth), assign required permissions, collect required identifiers, and configure the connector in Swimlane.
Prerequisites
Access Requirements
You must have permissions to:
- Register applications in Azure Active Directory (for OAuth 2.0)
- Assign API permissions and grant admin consent (for OAuth 2.0)
- Access the Exchange server / Exchange Online environment
- Configure RBAC permissions in Exchange (for certain tasks)
Required Credentials
During setup, you will collect the following based on your authentication method:
Method | Required credentials | Notes |
|---|---|---|
OAuth 2.0 Client Credentials | URL, Client ID, Client Secret, Tenant ID, SMTP Mailbox Address | Uses an Azure application with Exchange Online permissions. |
NTLM Authentication | Server URL, Username, Password, SMTP Mailbox Address | Exchange on-premises only. |
Authentication Methods Overview
Choose the authentication method based on your Exchange environment:
Authentication Method | When to use? |
|---|---|
OAuth 2.0 Client Credentials (Graph Confidential Client) | Recommended for Exchange Online and OAuth-based environments using an Azure application. |
NTLM Authentication | Only available for Exchange on-premises servers. |
OAuth 2.0 Client Credentials (Graph Confidential Client)
This authentication method allows you to authenticate using an Azure application.
Recommended API Permissions
Assign the following permissions to the Azure application:
- full_access_as_app (Application, Grant admin consent for organization)
- EWS_AccessAsUser.All / EWS.AccessAsUser.All (Delegated)
Azure Setup
Take the following steps to create the Azure app:
- Go to Azure Portal > Azure Active Directory > App Registrations.
- Click New Registration.
- Enter a name for your new application and choose Accounts in this organizational directory only, then click Register at the bottom.
- Navigate to API permissions tab on the left navigation menu.
- Select Add a permission.
- Select APIs my organization uses tab and search for "Office 365 Exchange Online".
- Select Application permissions and check the box next to full_access_as_app.
- Select Delegated permissions and check the EWS.AccessAsUser.All box.
- Click Add permissions.
- Select Grant admin consent for your organization.
- Navigate to Certificates & secrets tab and select New client secret.
- Fill out the description and expiration, click Add.
- Copy and save the secret Value you just created. This saved value is the Client Secret needed for the Swimlane asset.
- Navigate to Overview tab on the left menu.
- Copy Client ID and Tenant ID shown on this page.
Email Account Permission Setup
Microsoft Exchange uses RBAC Permissions (Role-Based Access Control).
Your account must be configured with the correct permissions for tasks to run correctly.
Required permissions
- DiscoveryManagement
- Impersonation
- These permissions are only required for the Delete from All Mailboxes task. You can still use the connector even if they are not configured.
- After setting permissions, it may take a couple of hours for the permissions to propagate within Exchange.
Setting Up Permissions Using Exchange Online Admin Center
Follow the instructions here to get to the Exchange Admin Center.
- Click permissions.
- Under Admin Roles, select Discovery Management and click the pencil icon to edit.
- A dialogue box will appear. In the dialogue box, under Members, click the plus icon to add a member.
- Search for and add the user, then click Ok.
- Click Save.
- Under Admin Roles, search for a role called ApplicationImpersonation.
- If this role does not exist, you must use Powershell to configure the Impersonation permission (see the section below).
- Click the pencil icon for ApplicationImpersonation and follow steps 3-5.
Setting Up Permissions Using Powershell
- On a Microsoft Windows computer, open an Administrator Command Prompt.
- To open a program as an administrator, right-click and select Run as Administrator and then run winrm get winrm/config/client/auth.
- If you do not see the line Basic=True in the output of the command, run the following command to enable Basic Authentication for WinRM: winrm set winrm/config/client/auth @{Basic="true"}
- Open Powershell as an administrator.
- Enable Exchange's Powershell scripts to configure your local Powershell and run the command: Set-ExecutionPolicy RemoteSigned If prompted, enter 'Y'.
- Now run $UserCredential = Get-Credential and enter your Exchange username and password. Your username will be your full email address.
- Run the following command to connect to Exchange Online's Powershell session:
- Import the remote session into your local shell using the following command: Import-PSSession $Session -DisableNameChecking
- Now that Powershell is connected and authenticated, you can modify user and group permissions.
Impersonation Permissions
- Run the command New-ManagementScope -Name:MYCUSTOMSCOPENAME -RecipientRestrictionFilter:FILTERCHANGEME to create a new management scope and replace MYCUSTOMSCOPENAME with a scope name such as SwimlaneImpersonationScope. Also, replace FILTERCHANGEME with a filter to select the user you'd like to grant the permissions. For example: To create a new management scope called SwimlaneScope for the user john: New-ManagementScope -Name:SwimlaneScope -RecipientRestrictionFilter:"Name -eq 'john'"
- Now apply the ApplicationImpersonation role to the user by running the following command, replacing CUSTOMNAME, MYACCOUNTHERE, and SCOPENAMEFROMABOVE:
- To stop editing permissions, run the command Remove-PSSession $Session. Otherwise, you may run out of allowed sessions to Exchange and will have to wait until they expire.
Discovery Management Permissions
- Run the command Add-RoleGroupMember -Identity "Discovery Management" -Member MYUSERNAME and replace MYUSERNAME with the username who you want to grant permissions to.
- Add-RoleGroupMember -Identity "Discovery Management" -Member MYUSERNAME. For example, to grant this permission to a user called integrations run: Add-RoleGroupMember -Identity "Discovery Management" -Member integrations
- To stop editing permissions, run the command Remove-PSSession $Session. Otherwise, you may run out of allowed sessions to Exchange and have to wait until they expire.
Connector configuration in Swimlane
Configuration - OAuth 2.0 Client Credentials
- Log in to Turbine.
- From the left-hand navigation pane, click ORCHESTRATION and click Assets. Asset homepage opens.
- Click the plus icon to open the Configure your Connector Asset window.
- Select Microsoft Exchange from the Asset type list.
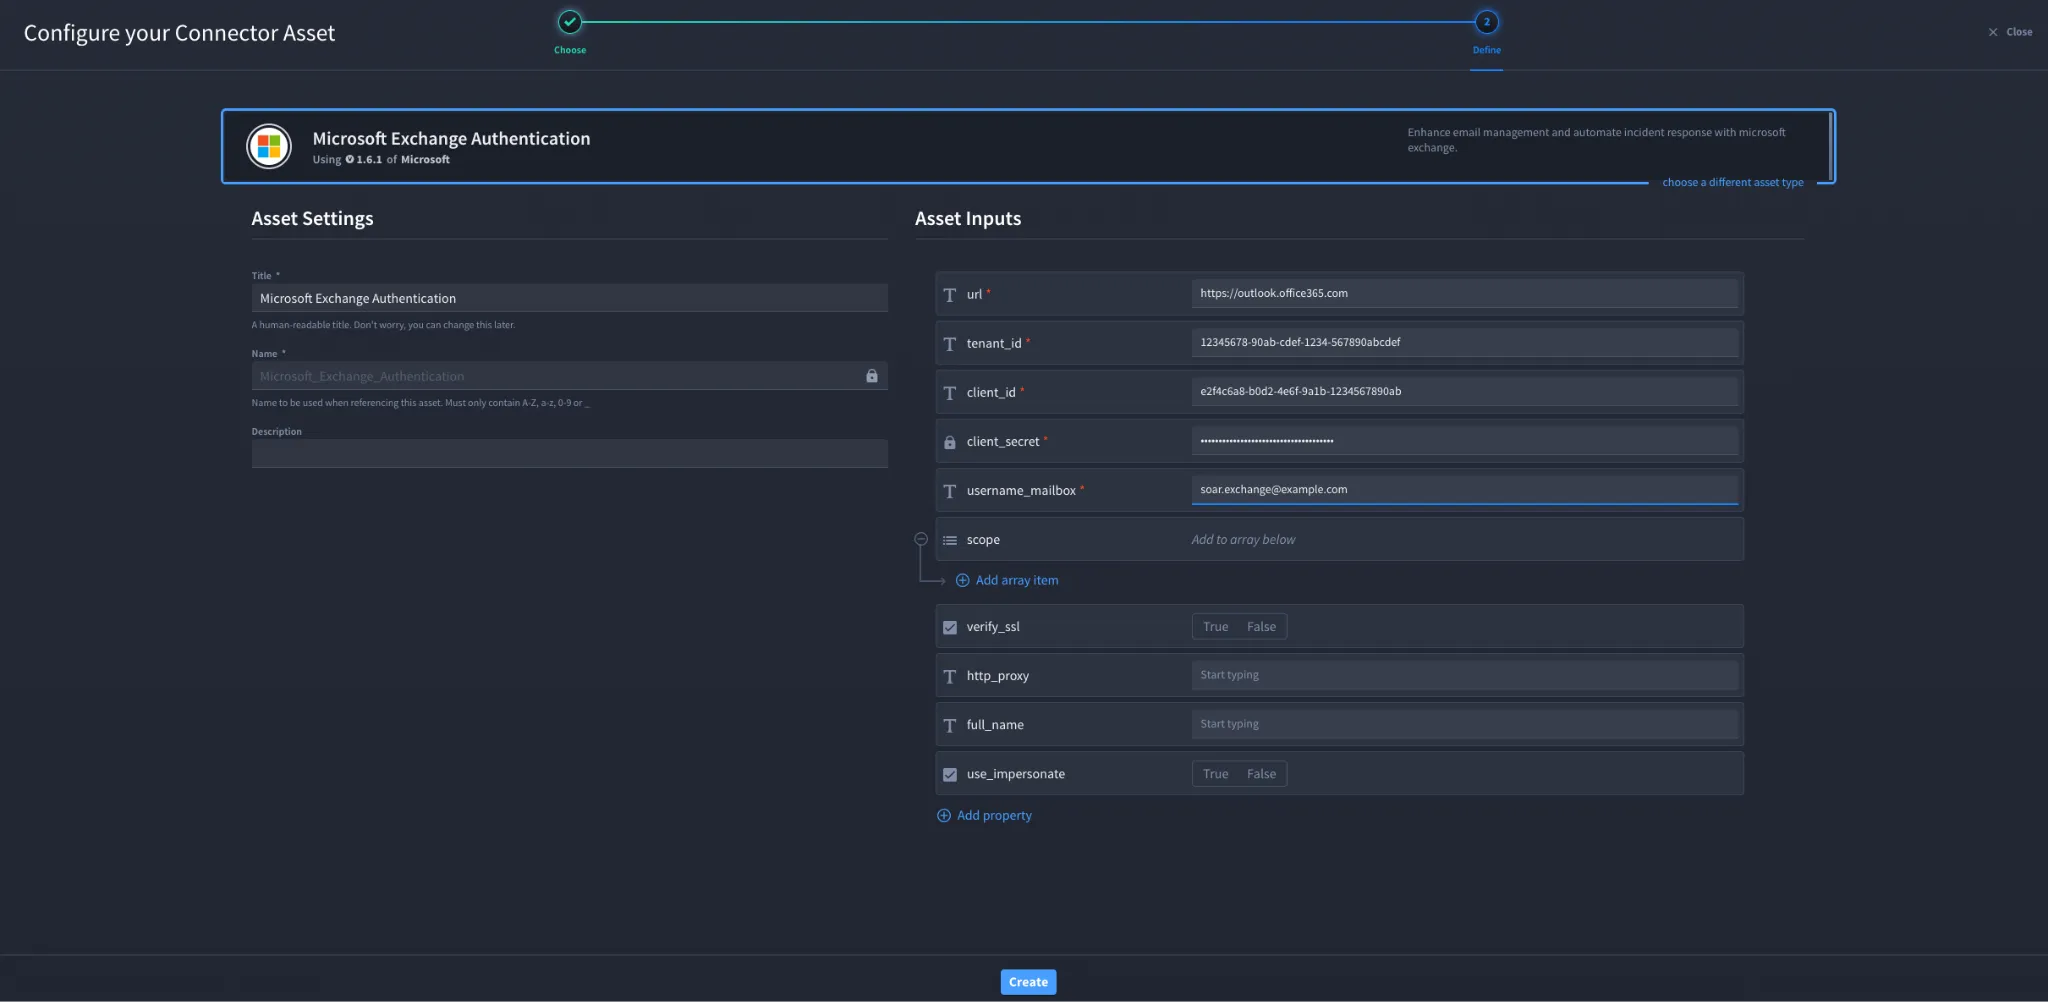
- Fill in the Asset Settings and Asset Input as shown:
Field | Description | Required/Optional |
|---|---|---|
url | Endpoint for the Microsoft Exchange server | Required |
tenant_id | Directory ID of the Azure AD tenant | Required |
client_id | Client ID from Azure app registration | Required |
client_secret | Client Secret from Azure app registration | Required |
scope | Optional, leave blank unless specified | Optional |
verify_ssl | Enable/Disable SSL Verification | Optional |
http_proxy | Optional proxy configuration | Optional |
username_mailbox | Mailbox email address (SMTP Mailbox Address) | Required |
full_name | User's full name | Optional |
use_impersonate | Use Impersonation rights to retrieve mail. If False will use Delegate permissions | Optional |
Fields with * marks are required.
- Click Create.
Microsoft Exchange NTLM Authentication
This authentication method is only available for Exchange on-premises servers.
Configuration - NTLM Authentication
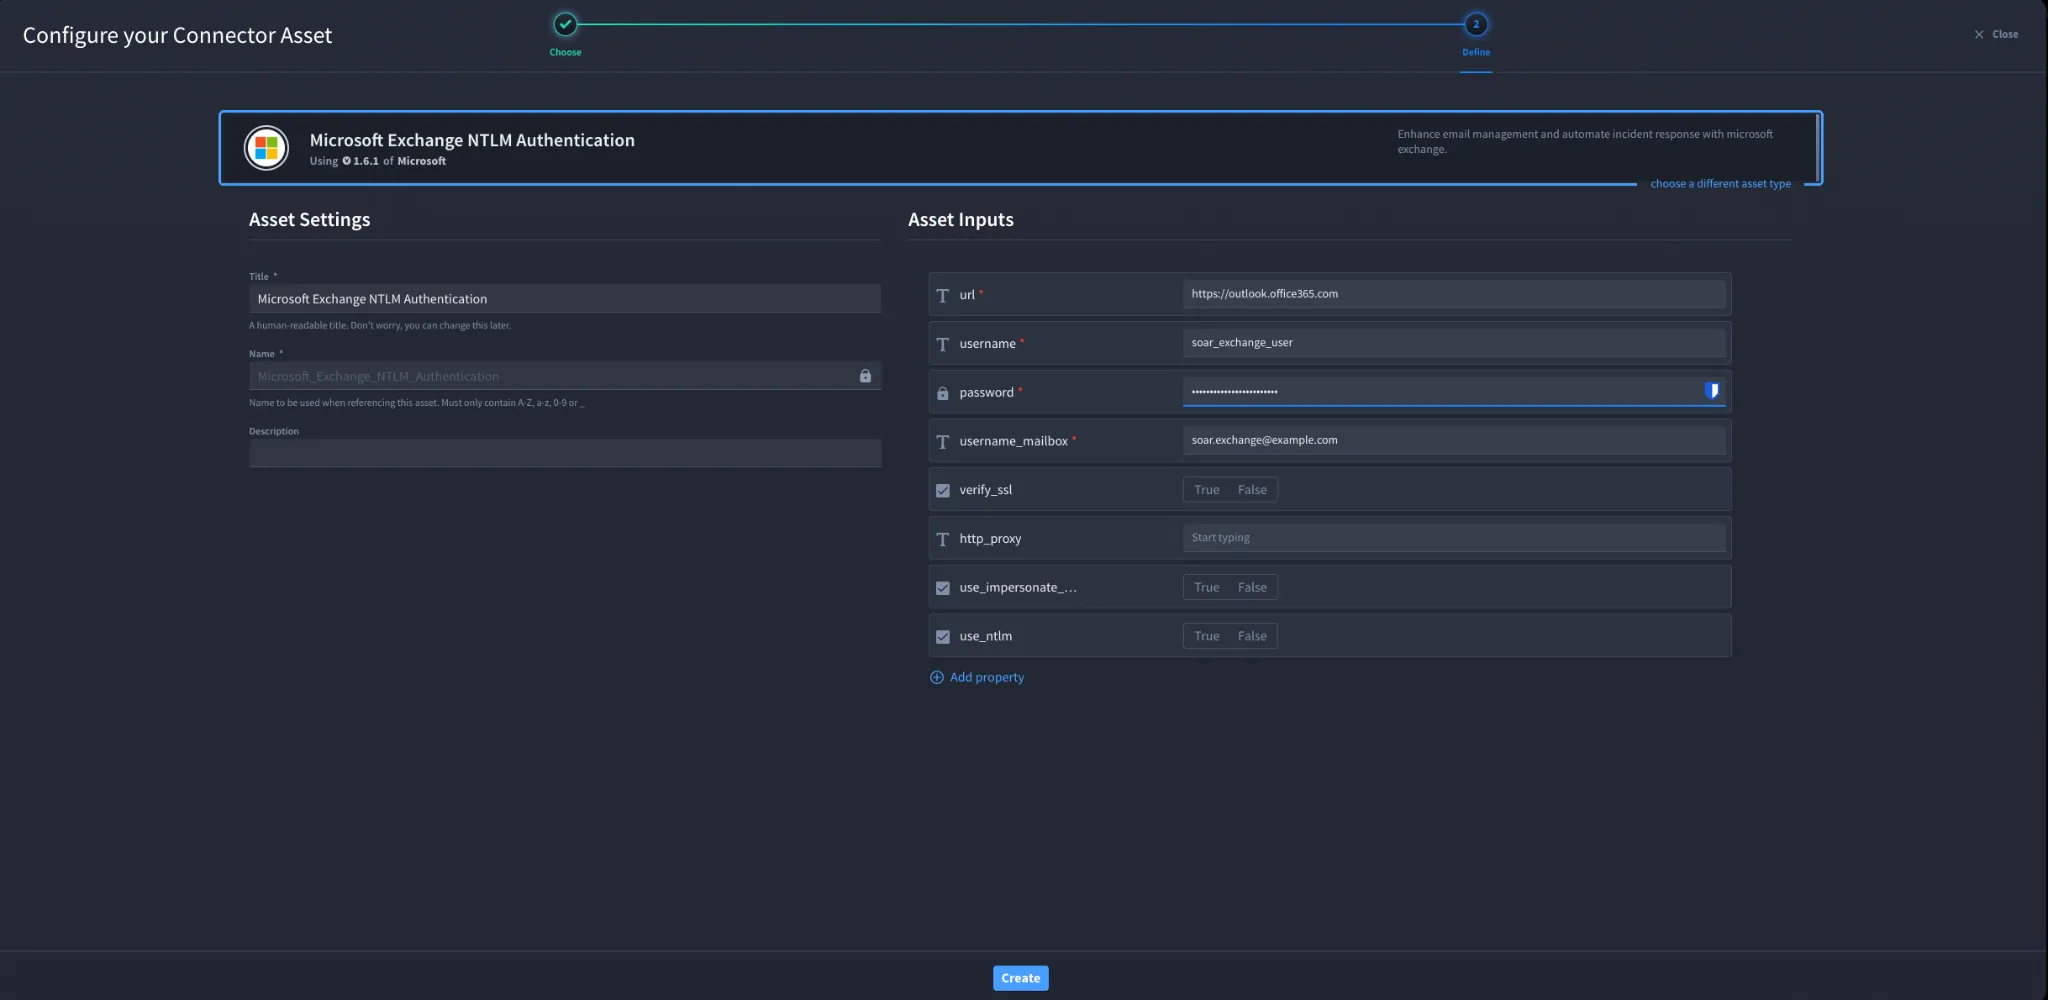
Fill in the Asset Settings and Asset Input as shown:
Field | Description | Required/Optional |
|---|---|---|
url | Endpoint for the Microsoft Exchange server | Required |
username | Email Address or Username | Required |
password | Password | Required |
verify_ssl | Enable/Disable SSL Verification | Optional |
http_proxy | Optional proxy configuration | Optional |
username_mailbox | Mailbox email address (SMTP Mailbox Address) | Required |
use_impersonate_access | Use Impersonation rights to retrieve mail. If False will use Delegate permissions | Optional |
use_ntlm | Use NTLM for authentication. otherwise, no authentication type will be applied. | Optional |
Troubleshooting
If you encounter an authentication error:
- Verify the Client ID, Client Secret, and Tenant ID are correct (OAuth 2.0).
- Verify admin consent has been granted for full_access_as_app.
- If you see Error AADSTS50076: Due to a configuration change made by your administrator, or because you moved to a new location, you must use multi-factor authentication to access, use a supported delegated authentication method (Graph Public Client) as required by your tenant configuration.
- If you see an ExchangeImpersonation SOAP header must be present for this type of OAuth token, verify your configuration matches the Graph Confidential Client setup and that the correct permissions are applied. For NTLM, confirm the Exchange server is on-premises and the username/password are correct.
- After changing Exchange RBAC permissions, allow time for permissions to propagate within Exchange.
You have successfully authenticated the Microsoft Exchange Connector in Swimlane.