Getting Started
This guide walks you through your first signal investigation in AI SOC. Follow these steps to understand the workflow and key features.
Investigation Approaches
AI SOC supports three complementary investigation approaches on the same Case Management record:
Approach | Summary |
|---|---|
AI assisted investigation | Hero AI generates a plan; you run steps manually (Generate Plan, execute steps) |
Agentic investigation | The Analysis agent runs without analyst intervention during the run—via Re-investigate in AI Alert Analysis (when Analysis Mode is Autonomous) or a Signal Routing Rule |
Review after routing | A routing rule already ran agentic investigation before you opened the record—review plan, verdict, and component results |
Hands-on steps for each approach are in Step 4: Choose How to Investigate, Step 5: Generate an Investigation Plan (AI Assisted), and Step 6: Run Agentic Investigation on the Record. Administrators who need agentic investigation to run automatically when signals arrive (for example, overnight triage) configure a routing rule after import—see Enable Agentic Investigation After Import later on this page.
Prerequisites
Before starting your first investigation:
- Where to work: Primary triage and investigation use Case Management and dashboards in the AI SOC Workspace (for example Analyst Triage Queue).
- Permissions configuration: Work with your organization to configure role-based permissions for AI SOC so users see the right actions (see Permissions Configuration below). Platform RBAC (legacy versus enhanced) also controls access to components and orchestration; see RBAC Considerations for AI SOCRBAC Considerations for AI SOC.
- Access: You have access to the Case Management application and AI SOC Workspace
- Hero AI: Hero AI is enabled for your tenant (required for plan generation and agentic investigation)
- Permissions: You have appropriate permissions to view signals, generate plans, run investigation steps, and update records
- Assets: Threat intelligence providers are configured (optional but recommended)
Permissions Configuration
User role permissions for AI SOC control what each role can see and do in the AI Alert Analysis panel on Case Management records (that is the panel title analysts see when viewing the AI Analysis widget output). Widget options alone are not always enough: users also need the right Turbine component and orchestration permissions for your account RBAC mode. For enhanced RBAC, analysts typically need Read and Execute on relevant components; for legacy RBAC, Orchestrator-level access is required for full AI SOC behavior. Routing rules that invoke AI SOC - Trigger Analysis Agent via Routing Rule also require a PAT token in an asset—see RBAC Considerations for AI SOCRBAC Considerations for AI SOC.
To configure widget permissions: open Applications & Applets → Case Management → Form Layout → Case Analysis tab, select the AI Analysis widget in the layout (it appears as AI Analysis in the form; on records it displays as AI Alert Analysis), then click Edit Widget. In the widget editor you set role-based access control (RBAC): each option can be enabled or disabled and restricted to specific role names (use * to allow all roles).
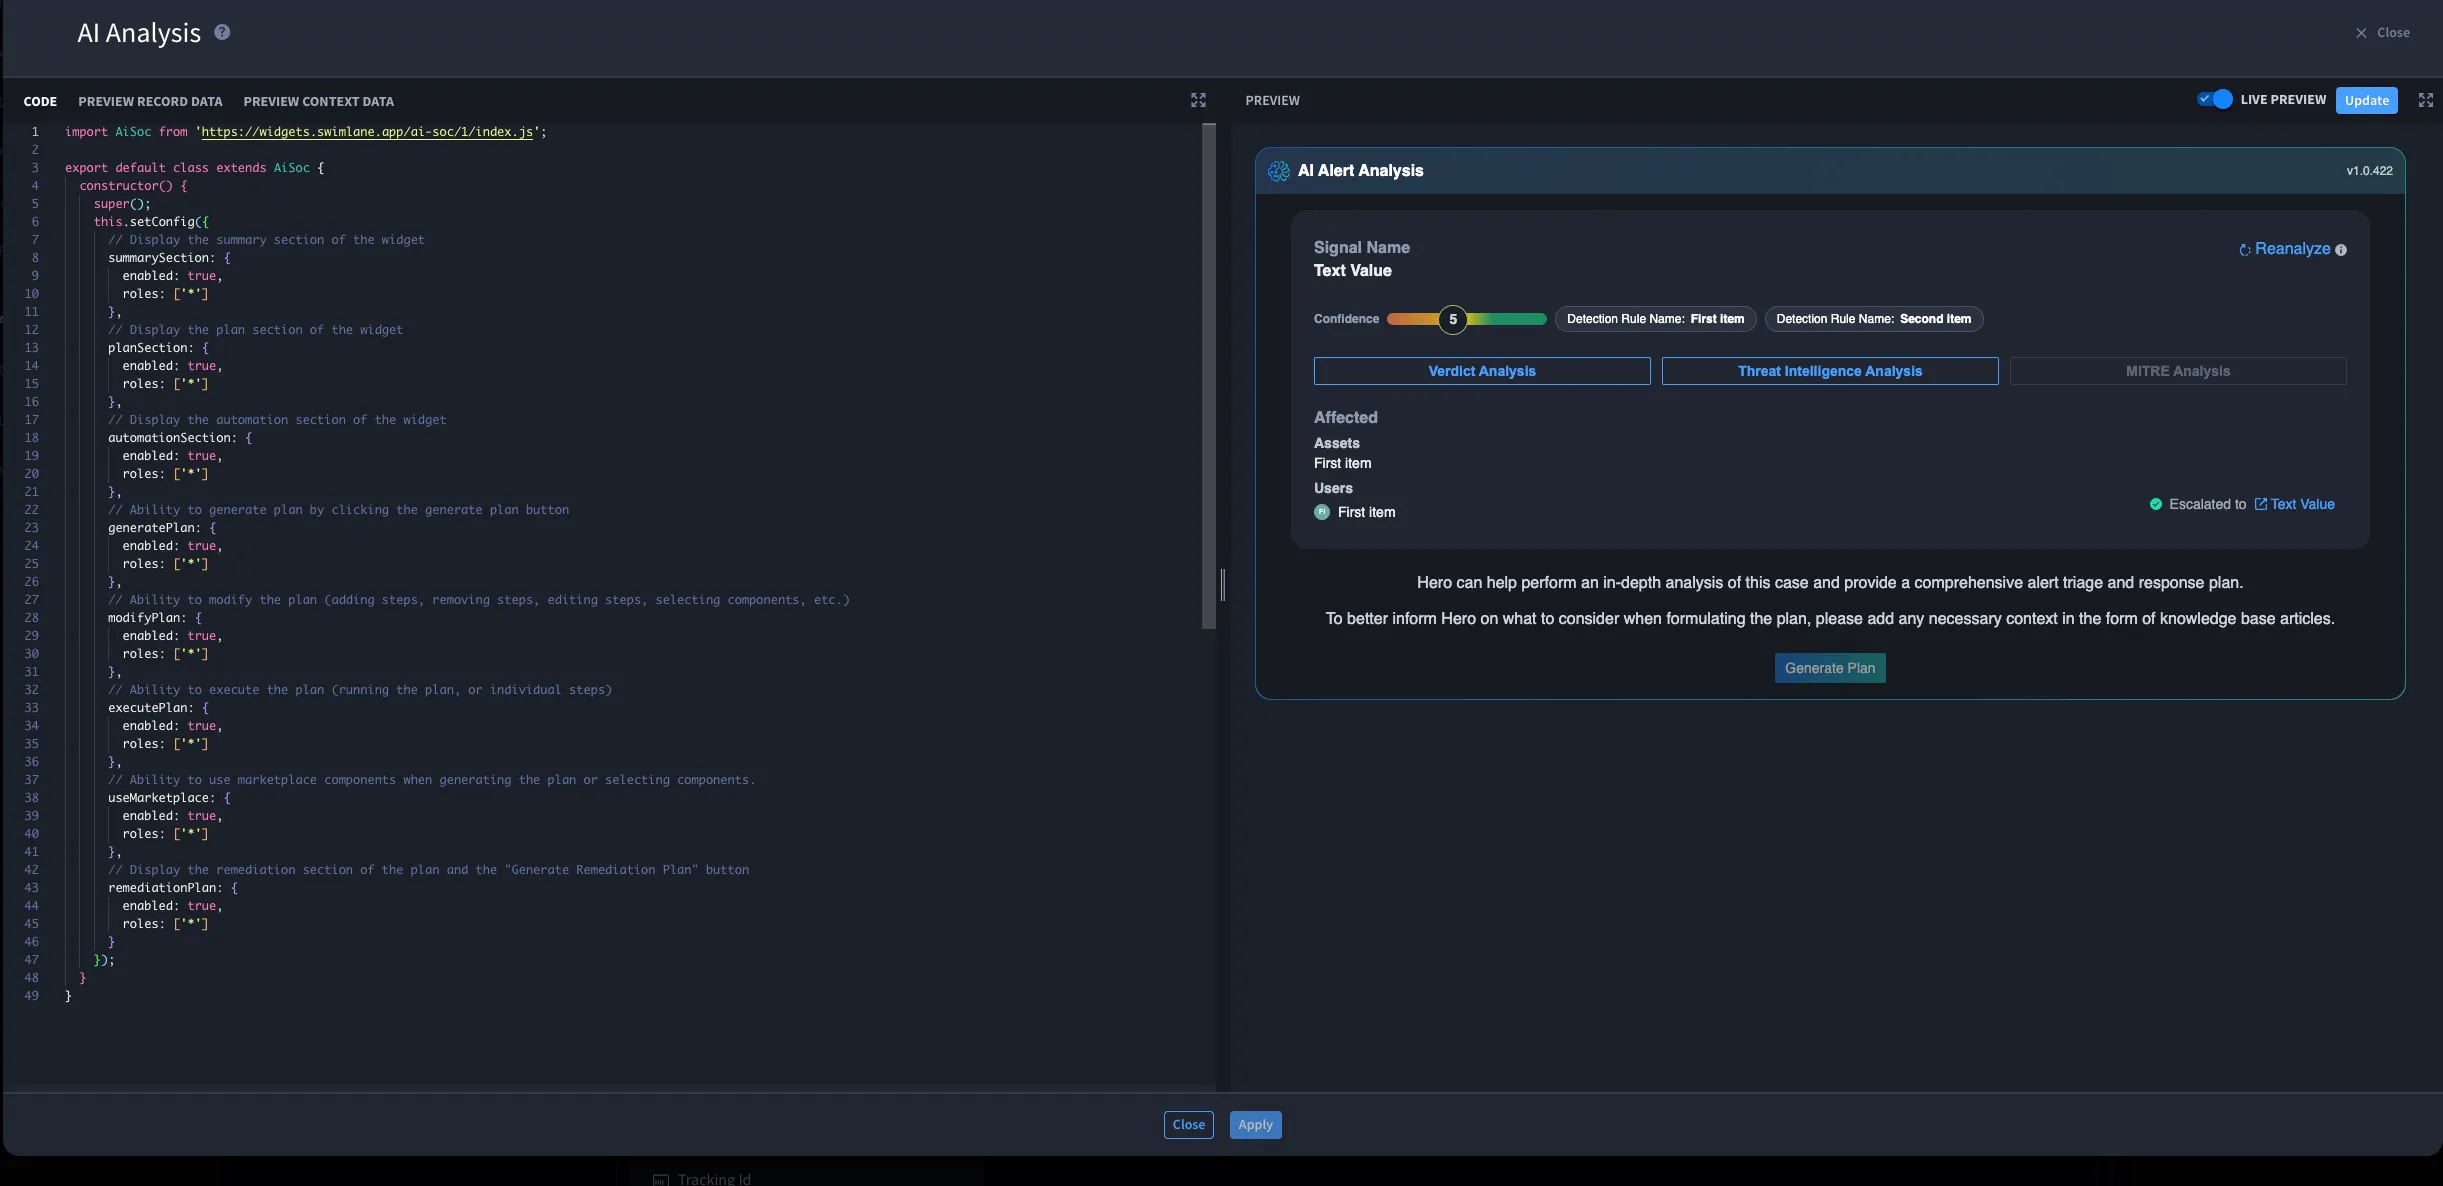
There are four default permissions (Create, Read, Update, Delete) as a baseline; you can customize them or use Grant Full Permissions to grant full access for a role. The widget also exposes these AI SOC–specific options (aligned with the widget configuration):
Option | Description |
|---|---|
summarySection | Display the AI analysis summary (verdict, threat intel, MITRE ATT&CK) |
planSection | Display the investigation plan section |
remediationPlan | Display the remediation plan section and Generate Remediation Plan button |
automationSection | Display the automation section (create triage rules and playbooks) |
generatePlan | Ability to generate investigation and remediation plans (for example, Generate Plan button) |
modifyPlan | Ability to modify plans (add/remove/edit steps, reorder, select components) |
executePlan | Ability to execute plans (run individual steps or run all) |
useMarketplace | Ability to search and install marketplace components when generating or editing plans |
How to configure: In the widget editor, each option can be turned on or off and limited to specific role names. Use * for an option to allow all roles; enter one or more role names (comma-separated if supported) to restrict that option to those roles. The four baseline permissions (Create, Read, Update, Delete) apply to the widget as a whole; use Grant Full Permissions for a role if that role should have full access to the panel without per-option limits.
Example: To let analysts view the summary and plan and run steps, but restrict automation and marketplace to admins: enable summarySection, planSection, generatePlan, modifyPlan, and executePlan for analyst roles (or *), and enable automationSection and useMarketplace only for admin or automation roles. Adjust to match your organization's roles.
Configure these so that analysts have the access they need without exposing actions that should be restricted (for example, automation or marketplace use) to roles that should not have them.
If you do not see AI features (for example, Generate Plan button or plan section): This is often due to Hero AI not being enabled or to RBAC/widget configuration. In Troubleshooting, see Hero AI Service Issues (Generate Plan button missing or does nothing) and Configuration Issues (RBAC: Features not visible or accessible). There you will find step-by-step checks: (1) Verify Hero AI and the feature flag are enabled for your tenant. (2) Review the AI Alert Analysis widget configuration and confirm your role is in the allowed roles for the sections and actions you need. (3) Verify your role assignments and application permissions. Doing these checks early avoids confusion when the button or sections do not appear.
Your First Signal Investigation
Step 1: Open Case Management and Select a Record
- Navigate to Application Records → Case Management
- Review the signal list to find a signal to investigate
- Tip: Start with a signal that has:
- Status: New or In Progress (avoid Processing for your first run—see below)
- Has observables (IPs, domains, hashes, URLs)
- Has completed threat intelligence enrichment (check Threat Intelligence Status)
- Click a record to open it
About Processing: New signals start in Processing until threat intel enrichment and signal evaluation (correlation, KB linking, Hero AI analysis) complete. Only then does status move to New, Closed, or Escalated. If you open a signal in Processing, wait for it to leave Processing before generating a plan, clicking Re-investigate, or expecting an AI verdict.
What to look for:
- Tracking Id (for example, CASE-1234) for reference
- Signal Source to understand where the alert originated
- First Created timestamp to see how long the signal has been open
Step 2: Review Key Fields on the Signal
Start by understanding the record's basic information and current state. On the Case Management record, review these fields:
- Current Owner: Is the signal assigned? If not, you may want to Claim it
- Organization: Which organization does this signal belong to?
- Signal Type: Alert, Phishing, or Triage (a classification value on the Case Management record)
- Signal Source: Where did this alert come from? (SIEM, EDR, email, and similar)
- Intelligence Verdict: What does threat intelligence say? (Malicious, Suspicious, Benign, Unknown)
- Status: Current workflow state (Processing, New, In Progress, Resolved, and similar). Processing means enrichment and signal evaluation are still running; the signal will move to New, Closed, or Escalated when done.
- Priority: Business priority (Low, Medium, High, Critical)
- Severity: Technical severity (Informational, Low, Medium, High, Critical)
- Classification: Analyst classification (True Positive, False Positive, Unknown)
- Manual Verdict: Has an analyst set a verdict? (Malicious, Suspicious, Benign, Unknown)
Actions to take:
- If the signal is unclaimed and you are investigating it, click Claim in the controls area
- Update Status to In Progress if you are actively working on it
- Review Priority and Severity to ensure they are set appropriately
Step 3: Check Evidence and Context
Before investigating, review the evidence and context available on the record. In the UI these are in the same section (not in separately labeled "panels").
Knowledge Base Articles:
- Purpose: Shows linked KB articles that provide investigation guidance
- What to look for: Articles that match this signal type or observable patterns
- Action: If relevant KB articles are linked, review them for standard procedures
- Tip: KB articles provide baseline context that helps Hero AI generate better plans and agentic investigation runs
Threat Intelligence:
- Purpose: Shows enrichment results for observables (IPs, domains, hashes, URLs)
- What to look for:
- Threat Intelligence Verdict: Overall verdict from TI providers
- Observables: List of extracted observables and their verdicts
- Enrichment Status: Are enrichments complete or still pending?
- Action:
- If enrichments are pending, wait for them to complete before generating a plan or starting investigation
- Review observable verdicts to understand threat context
- Click on an observable to view detailed TI information
Correlation:
- Purpose: Shows related signals and cases
- What to look for:
- Similar signals that may have already been investigated
- Related cases that might contain relevant context
- Correlation status (Pending, Processing, Complete)
- Action:
- Review similar signals to see how they were handled
- Check if a case already exists for related activity
- Use correlation to avoid duplicate work
Rules:
- Purpose: Shows routing rules that matched this signal
- What to look for: Which rules triggered and which playbooks ran (including agentic investigation via AI SOC - Trigger Analysis Agent via Routing Rule)
- Action: Understand what automated processing has already occurred. If a routing rule already ran agentic investigation overnight, the plan, verdict, and component results may be on the record when you open it.
Step 4: Choose How to Investigate
In AI Alert Analysis, you investigate in one of three ways:
Approach | When to use |
|---|---|
AI assisted investigation | Hero AI generates a plan; you run steps manually (Generate Plan, execute steps) — continue with Step 5 |
Agentic investigation | The Analysis agent runs without analyst intervention during the run—via Re-investigate in AI Alert Analysis (when Analysis Mode is Autonomous on Support) or a Signal Routing Rule — continue with Step 6 |
Review after routing | A routing rule already ran agentic investigation before you opened the record—review plan, verdict, and component results, then continue with Step 7 |
All approaches use the same Case Management record. This path covers investigation only—not automated remediation.
Step 5: Generate an Investigation Plan (AI Assisted)
Once you have reviewed the evidence, generate an AI-powered investigation plan.
- Scroll to the AI Alert Analysis panel on the signal record
- Pre-plan view: If no plan exists yet, you will see:
- AI verdict summary (if available)
- Confidence meter
- MITRE ATT&CK context
- Guidance message
- Generate Plan button
- Click Generate Plan
- Wait for Hero AI to analyze the signal and generate investigation steps. Progress detail messages update in the panel while generation runs (for example, reading signal details, threat intelligence, or building the plan). Plan actions are disabled until generation finishes.
- The plan appears organized into phases: Preparation, Analysis, and Determination
What happens during plan generation:
- Hero AI analyzes the signal data, observables, threat intelligence, and knowledge base articles
- It generates investigation steps based on the signal context
- Steps are mapped to available tools and integrations
- Steps that require missing integrations will show an Install option
If plan generation fails:
- Check that Hero AI is enabled (see Troubleshooting)
- Verify observables exist on the signal
- Ensure threat intelligence enrichment has completed
- Check browser console for errors
When evidence or KBAs change after a plan exists, use Regenerate Investigation Plan instead of starting from scratch. See Investigation Plan WorkflowInvestigation Plan Workflow.
Users without permission to install a component from a generated plan see a permissions notification. Ask an administrator or install the component from Library → Swimlane Content if needed.
Step 6: Run Agentic Investigation on the Record
When Analysis Mode is Autonomous, the Analysis agent runs an end-to-end investigation without an analyst executing plan steps. Set Analysis Mode in the case metadata column on Case Analysis or on Support, then click Re-investigate in AI Alert Analysis.
The agent reads case context, linked threat intelligence observables, knowledge base articles, correlated cases, and tenant components marked Visible to Hero AI. It searches for relevant enrichment tools, runs them, and builds a narrative in the Agent Investigation panel—for example, a case summary, key observables from TI, step groups with completion counts, enrichment findings, and a final verdict with confidence and recommended actions. Component inputs and outputs are stored on the record (including attachments). Analysis Agent Request ID, Analysis Agent Session, and Analysis Status on Support track the run (Not Started, In Progress, Completed, Failed, Cancelled).
- Open the signal after Processing completes (unless your tenant allows earlier start)
- Set Analysis Mode to Autonomous on Case Analysis or Support
- In AI Alert Analysis, click Re-investigate to start agentic investigation (which invokes AI SOC - Trigger Analysis Agent)
- Watch the Agent Investigation panel until the status badge shows Complete (or Failed / Cancelled)
- Review Investigation Summary, confidence, verdict, and recommended actions in Signal Summary
Re-investigate again: Click Re-investigate after KBAs or evidence change materially. Confirm the dialog—re-investigating removes current agent progress and associated data, resets the case verdict to the initial verdict, and cannot be undone. Update linked Knowledge Base Articles before you confirm if you want the agent to follow new guidance.
To run agentic investigation automatically when signals arrive (for example, overnight triage), complete Enable Agentic Investigation After Import after you finish this walkthrough.
Step 7: Review and Execute Plan Steps
If a routing-rule analysis run or on-record Re-investigate already completed investigation, review the plan, component inputs and outputs, and verdict on the record. Adjust Manual Verdict if needed, then continue to remediation or automation.
For manual investigation, work through plan phases systematically.
Preparation Phase:
- Purpose: Validate observables and confirm alert context
- Typical steps: Enrich observables with multiple TI providers, get endpoint details
- Action:
- Review each step before running
- Click Review to see what the step will do
- Click Run for individual steps or Run All Steps for the entire phase
- Wait for steps to complete and review results
Analysis Phase:
- Purpose: Verify scope, impact, and lateral movement
- Typical steps: Search SIEM/EDR for related activity, check for similar infections, get user details
- Action:
- Execute steps to gather evidence
- Review results in the step timeline (data from all executed steps, in any phase, is saved to the record and written to the timeline)
- Add notes if you modify or skip steps
- Document findings in investigation comments in the linked case (comments and evidence are added to the case record, not the signal record)
Determination Phase:
- Purpose: Finalize the verdict
- Typical step: Generate verdict using AI SOC - CASE Hero AI Analysis
- Action:
- Run the verdict generation step (or review the verdict if agentic investigation or a routing-rule analysis run already set it)
- Review the AI verdict, confidence, and reasoning
- Set a Manual Verdict if you disagree with the AI verdict
- Add investigation comments explaining your decision in the linked case (not on the signal record)
Tips for executing steps:
- Steps that show Install need integrations to be installed first
- Use Mark as Done if you have completed a step manually outside the system
- Use Delete Step to remove steps that are not relevant
- Use Add Additional Step to include custom investigation steps
Step 8: Generate Remediation Plan
- In the AI Alert Analysis panel, find the Remediation Plan section
- Click Generate Remediation Plan when it is enabled (see note below)
- Review the AI-generated remediation steps. Progress detail messages appear while Hero AI builds the plan.
- Execute remediation steps as appropriate (remediation remains analyst-controlled even when you used agentic investigation)
- Document any remediation actions taken in the linked case
If the verdict or investigation findings change, use Regenerate Remediation Plan in the same section. See Investigation Plan WorkflowInvestigation Plan Workflow.
- The Generate Remediation Plan button is disabled only when: (1) the investigation plan section does not exist, (2) a plan is currently being generated, or (3) a remediation plan has already been generated. In all other scenarios the button is enabled; you decide whether to generate a plan.
- Recovery steps from a Generate Remediation Plan output (when you use that feature) are not included when you use Create a Playbook. Auto-generated investigation playbooks focus on investigation and containment (for example, isolate host). Adding recovery into the same automated run would often undo containment immediately (for example, rejoining a host after isolation). You should still automate recovery at scale by maintaining reusable recovery playbooks (for example, standard templates in Orchestration → Playbooks) and running them after containment is verified and change management allows, rather than performing one-off manual recovery for every case. You can seed those playbooks from the remediation plan once, then reuse them. See TroubleshootingTroubleshooting.
Step 9: Document and Resolve
After completing the investigation, document your findings and resolve the record. Comments and evidence cannot be added to the signal record when your workflow requires a linked case; add them in the linked case for this record.
Document findings (in the linked case):
- Open the case linked to this signal and add Investigation Comments explaining:
- What you found
- Why you reached your verdict
- Any actions taken
- Recommendations for follow-up
- Update Investigation Summary with key findings in the case
- Attach any relevant evidence files in the case if needed
Set the verdict (on the signal):
- On the record, set Manual Verdict:
- Malicious: Confirmed threat requiring response
- Suspicious: Needs further investigation
- Benign: False positive, no threat
- Unknown: Insufficient data to determine
- Set Classification (True Positive, False Positive, Unknown)
Update status:
- Set Status to Resolved when investigation is complete.
- If investigation is still open, use In Progress or New per your process. Escalated may be set automatically when the pending CASE resolution flow applies your tenant's verdict and confidence rules (see Operations and GuidanceOperations and Guidance). You stay on the same Case Management record (prefix CASE-) for triage through resolution unless your organization uses an additional linked record.
Step 10: Create Automation (Optional)
If this signal pattern will repeat, create automation to handle similar signals in the future. Create a Playbook works after manual investigation or after an agentic investigation session—the suggested components come from the investigation plan or a Trigger Analysis Agent run.
Create a Triage Rule:
- In the AI Alert Analysis panel, go to the Automation section and click Create a Triage Rule.
- What gets created: A record is created in the Signal Routing Rules application (for example, RULE-29). A link to the new rule record is shown—click it to open the record. You can also open, edit, and enable the rule from Application Records → Signal Routing Rules or from the Routing Rule Management dashboard.
- What you configure on the record: Rule Name (pre-populated from the signal name; edit as needed), Rule Application (for example, Case Management), Description (optional), and Enabled (off by default—turn on when ready). In the IF section, define conditions (for example, Signal Name contains "X", severity, source, observables) using the condition builder (AND/GROUP for multiple criteria). In Associated Playbook, select a playbook that uses Rule-Execute, then apply the rule to the playbook. See Building Routing Rule PlaybooksBuilding Routing Rule Playbooks.
- The new rule is assigned Rule Order automatically (highest existing order excluding rules associated with AI SOC - Trigger Analysis Agent via Routing Rule, then +1), so specific triage rules stay before a correctly configured catch-all. Save the record, then enable the rule when ready.
- What it does when enabled: The rule evaluates incoming signals. When a signal meets all of the rule's conditions, the associated playbook runs. To test without waiting for new signals, use Run this rule against pending signals from the rule record's Support tab. To reorder, enable, or edit rules later, use the Routing Rule Management dashboard (see AI SOC Applications).
Create a Playbook:
- In the Automation section, click Create a Playbook. The playbook opens in a new window (not a slider).
- The playbook builder opens with suggested components from your investigation plan or an agentic investigation session. Recovery steps from a remediation plan are not included (by design); see the note under Step 8. Add recovery through a separate reusable playbook or approved process.
- Review and customize the playbook, then Save.
- After you save, the associated routing rule is updated with this playbook. Links to the rule record and the playbook are shown so you can click to open either one. Enable the rule to run it on future signals.
- To test immediately, use Run this rule against pending signals from the routing rule's Support tab.
If the investigation plan changed after you first opened the playbook builder, use Recreate Playbook in Automation to regenerate the associated playbook from the current plan. See Creating AutomationCreating Automation.
To build or attach a playbook manually (duplicate, Orchestration, or generate-then-cancel template), see Building Routing Rule PlaybooksBuilding Routing Rule Playbooks.
Playbook creation requires browser pop-ups to be enabled for your Swimlane domain. If components are missing, check pop-up blocker settings or see Troubleshooting.
Enable Agentic Investigation After Import
For agentic investigation at scale (for example, overnight triage), create and enable a Signal Routing Rule after you install the solution packages. The packages ship the AI SOC - Trigger Analysis Agent via Routing Rule playbook and AI SOC - Trigger Analysis Agent component, but no pre-seeded Signal Routing Rule records. Routing rules reference playbooks in ways that do not import reliably with the package, so you create and enable rules after import.
On-record agentic investigation does not require a routing rule. Analysts can set Analysis Mode to Autonomous and click Re-investigate in AI Alert Analysis—see Step 6: Run Agentic Investigation on the Record. This section is for routing-rule agentic investigation at scale.
Quick Path
Step | Action |
|---|---|
1 | Confirm AI SOC Solution and AI SOC Trigger Analysis Agent content are installed from Library → Swimlane Content — see Installing and Configuring AI SOC Solution |
2 | In Orchestration → Playbooks, confirm AI SOC - Trigger Analysis Agent via Routing Rule exists (it ships disabled) |
3 | Configure a PAT token in the asset used by that playbook — see RBAC Considerations for AI SOC — Trigger Analysis Agent and Routing Rules |
4 | Enable AI SOC - Trigger Analysis Agent via Routing Rule in Orchestration when you are ready to use it |
5 | Create a Signal Routing Rules record (Application Records → Signal Routing Rules, or Routing Rule Management → Add New Rule) |
6 | Set IF conditions. For a catch-all agentic rule, set Rule Order to a high value such as 99999 so more specific routing rules evaluate first. Associated Playbook must be AI SOC - Trigger Analysis Agent via Routing Rule (required—not any high-order default rule), then Apply rule to playbook. Optionally name the rule AI Agentic Investigation |
7 | Enable the rule and test with Run Rule Against Pending Signals on the rule Support tab |
Requirement: The catch-all for unmatched or first-seen signals must associate AI SOC - Trigger Analysis Agent via Routing Rule. Setting a high Rule Order without that playbook does not configure agentic catch-all behavior, and Create a Triage Rule may assign new rules an order after your catch-all. See Building Routing Rule PlaybooksBuilding Routing Rule Playbooks.
For condition design, rule order, and troubleshooting, see Building Routing Rule PlaybooksBuilding Routing Rule Playbooks and RBAC Considerations for AI SOCRBAC Considerations for AI SOC.
Common First-Time Mistakes to Avoid
Mistake 1: Generating plan before enrichment completes
- Problem: Plan may be incomplete without TI context
- Solution: Wait for Threat Intelligence Status to show complete before generating a plan or starting investigation
Mistake 1a: Expecting a plan or verdict while status is Processing
- Problem: Signals in Processing have not yet completed evaluation; Generate Plan, Re-investigate, and AI verdict are not ready.
- Solution: Wait until status changes to New, Closed, or Escalated before investigating or judging readiness.
Mistake 2: Not claiming signals
- Problem: Multiple analysts may work on the same signal
- Solution: Always Claim signals you are investigating
Mistake 3: Skipping evidence and context
- Problem: Missing important context from KB articles, threat intelligence, or correlation
- Solution: Review all evidence areas (Knowledge Base, Threat Intelligence, Correlation, Rules) before generating a plan or clicking Re-investigate
Mistake 4: Not documenting deviations
- Problem: Future investigations may repeat unnecessary steps
- Solution: Add notes when you skip or modify AI-suggested steps
Mistake 5: Forgetting to set manual verdict
- Problem: Signals resolved without verdicts do not improve AI learning
- Solution: Always set Manual Verdict when resolving signals
Next Steps
After completing your first investigation:
- Review the workflow: Understand how signals flow through your SOC
- Read best practices: Review Operational Best PracticesOperational Best Practices for optimization tips
- Learn about applications: See AI SOC ApplicationsAI SOC Applications for detailed application walkthroughs
- Understand troubleshooting: Bookmark TroubleshootingTroubleshooting for common issues