Configuration Manager
The Configuration Manager is a centralized tool within Swimlane Turbine that streamlines asset management across multiple tenants. This feature is designed for MSSP Admins and Orchestrators, allowing users to configure and manage assets outside Canvas efficiently. With powerful filtering, search, and bulk operation capabilities, it significantly reduces manual effort and accelerates workflows for deployment and troubleshooting.
Why Use the Configuration Manager?
- Centralised Asset Management: Access and manage all assets across tenants in one place.
- Seamless Multi-Tenant Management: Simplify deployment across multiple tenants without switching contexts.
- Error Visibility: Quickly identify and resolve configuration errors through intuitive feedback mechanisms.
Key Features
- Table-Based UI: View and manage all assets across tenants in an intuitive table layout.
- Asset Type Support: Configure HTTP actions, authentication assets, and custom assets.
- Create, Update, Delete Assets: Handle individual asset configurations efficiently.
- Bulk Edit: Update common fields for multiple assets simultaneously.
- Error Resolution Feedback: Detailed error messages to assist with troubleshooting.
- Search and Filter: Quickly locate assets using filters and search capabilities.
Who Should Use the Configuration Manager?
- Orchestrators/Builders: Advanced users configuring and deploying playbooks who require precise control over asset details.
- Account Admins/MSSP Administrators: Users managing multi-tenant configurations with a need for streamlined, high-level asset management.
How to Access the Configuration Manager
- Log in to Swimlane Turbine.
- Navigate to the Admin Panel > Library, select Configuration Manager.
Configuration Manager Dashboard
The Configuration Manager provides centralised visibility into asset health and allows administrators to test connector assets individually or in bulk across tenants.
Asset Health Metrics
At the top of the Configuration Manager page, summary metrics provide visibility into asset status across the environment.
Metric | Description |
|---|---|
Total Assets | Total number of configured assets. |
Assets with Scheduled Testing | Number of assets with automatic testing enabled. |
Online | Number of assets whose most recent connection test completed successfully. |
Offline | Number of assets whose most recent connection test failed. |
Step-by-Step Guide
Asset Creation Prerequisites
Before creating an asset, ensure:
- Tenants Must Exist: Assets are tenant-specific. If no tenants exist, the Create Asset button will be disabled. Click Create Tenant to proceed.
- Vendor-Specific Connectors Installed: Some asset types require specific connectors. If connectors are not installed, proceed to the Connector Library to add them.
Creating an Asset
- Access the Configuration Manager: Navigate to Library > Configuration Manager and click Create Asset.
- Select Tenant: Choose the tenant for which the asset is being created.
- Choose Asset Type: Select from available asset types, such as Custom Asset, OAuth, or HTTP Authentication. Use Connector Details for documentation.
- Install Missing Connectors (Optional): Use Find Connectors to locate and install required plugins.
- Define Asset Details: Provide required fields like API keys, secrets, or configuration parameters. Click Create to finalize.
Viewing Asset Configuration
- Open the Configuration Manager.
- Browse the table to view all assets across tenants.
- Tenant name
- Asset type (hover to see version)
- Name (hover to see the last modified time and date)
- Inputs
- Missing - Any required inputs with empty values will be displayed as "missing," while those with default values populated will not be marked as missing.
- If an asset has a default value for a required property that needs reconfiguration, it is still classified as complete rather than missing.
- In some cases, if a required field contains sensitive information, obfuscation is still considered valid, and the field is marked as complete rather than missing.
- Creator
- Test Status: Displays the result of the most recent connection test.
- Possible values include:
- Success – The most recent connection test completed successfully.
- Failure – The most recent connection test failed.
- None – No connection test has been run.
- Last Tested: Displays the date of the most recent connection test.
- Automated Testing: Indicates whether automatic connection testing is enabled for the asset.
- Possible values include:
- On – Automatic connection testing is enabled.
- Off – Automatic connection testing is disabled.
- Input Status: Indicates whether the asset configuration is complete or missing required inputs.
- Possible values include:
- Complete – Required asset inputs have been configured.
- Missing – One or more required inputs are missing.
- You can refine the asset list using filters (for example, Tenants, Playbooks, Asset Type, and Creator) or the search bar.
- Click Edit to modify specific assets.
Editing Assets
- Locate the asset you want to update.
- Click Edit next to the asset.
- Modify the required fields and save.
Test a Single Asset
You can test an individual asset directly from the Configuration Manager.
For prerequisites, eligibility by asset type, and what to do when a connector does not support testing, see Test Connector AssetsTest Connector Assets.
To test a single asset:
- Locate the asset in the Configuration Manager table.
- Click the ellipsis (⋮) menu next to the asset.
- Select Test.
The platform performs a connection test using the asset configuration and updates the test results when the test completes.
The Test option is available only for assets that support connection testing. Starting in Turbine 26.2.0, the user role must include Assets → Test permission. See Test Connector AssetsTest Connector Assets and Enhanced Role-Based Access Control (RBAC)Enhanced Role-Based Access Control (RBAC).
Deleting Assets
- Locate the asset you want to delete.
- Click the Delete button next to the asset.
- A confirmation dialog will appear:
- Message: "Are you sure you want to delete the selected asset?"
- Warning: Deleting assets will remove them from their associated tenants and any playbooks they are used in.
- Click and hold the Delete button in the dialog to confirm the action.
- The asset is removed from the Configuration Manager.
Bulk Editing Assets
- Select multiple assets of the same asset type by checking their boxes. Note: You can select the asset type associated with different connector versions. When doing so, the default inputs from the latest connector version will automatically be displayed.
- Click Edit in the toolbar.
- A dropdown menu will appear, allowing you to choose Settings or Inputs.
- Settings allow you to edit the Title and the Description.
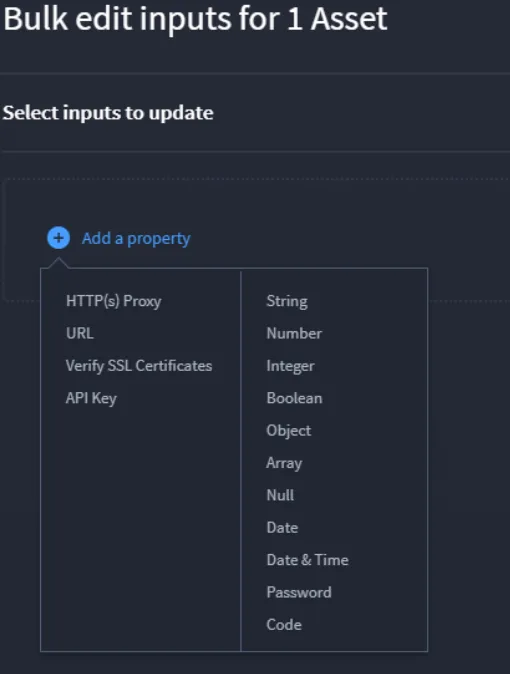
- Input allows you to update the asset properties
- Default connector properties are displayed in a list on the left side, regardless of whether they are used in the asset.
- For custom assets, only data types are displayed. To update these properties, select the appropriate data type, then enter the name of the property and the value you want to modify. Note that this action will overwrite the existing value for the specified property. Note that the input names are case-sensitive.
- Modify the fields for the selected assets. If the input is not present in the asset during a bulk edit, it will be added. If the input is already present, it will be updated.
- Click Apply or Save to confirm the changes.
Test Multiple Assets
You can test multiple assets simultaneously from the Configuration Manager.
Bulk connection tests require Assets → Test permission for each tenant. See Test Connector AssetsTest Connector Assets and Enhanced Role-Based Access Control (RBAC)Enhanced Role-Based Access Control (RBAC).
To run a bulk connection test:
- Select one or more assets using the checkboxes in the table.
- Click Test Connections in the toolbar.
- Wait for the tests to complete.
Connection tests are executed for each selected asset and the results are displayed when testing finishes.
Bulk Test Results
After a bulk test completes, a results page displays the outcome for each tested asset.
The results table includes:
- Name
- Tenant
- Asset Type
- Playbooks
- Input Status
- Test Status
- Automated Testing
- Results
To review additional information for a tested asset:
- Locate the asset in the results table.
- Click View in the Results column.
A summary of the connection test results is displayed.
For per-asset configuration, connection testing history, usage information, and automatic testing settings, see AssetsAssets and Test Connector AssetsTest Connector Assets.
Unsupported Assets
Some connector assets do not support connection testing. If one or more selected assets are ineligible, the connection test cannot run for those assets and the platform displays a message or tooltip.
Deselect unsupported assets and test only connector assets that support connection testing. For eligibility rules and how to request test support for a connector, see Test Connector AssetsTest Connector Assets.
Bulk Deleting Assets
- Select one or more assets by checking the boxes in the table.
- Click the Delete button in the toolbar.
- A confirmation dialog will appear:
- Message: "Are you sure you want to delete the selected assets?"
- Warning: Deleting assets will remove them from their associated tenants and any playbooks they are used in.
- Click and hold the Delete button in the dialog to confirm the action.
Filtering and Search
- Use filters to refine the asset list by:
- Tenants, Playbooks, Asset Type, and Creator.
- The tenant filter acts as the primary filter. In addition to filtering the data in the table to show only the selected tenants, it also updates the values of other filters, such as Playbook, Asset Type, and Creator to display options relevant to those tenants.
- If multiple filters are applied and no matching data is found, a message stating "No data to display" will appear. Users can modify the filters to retrieve the desired data.
- Use the search bar to find specific assets by name.
Relationship to Asset History
Connection tests initiated from the Configuration Manager update the asset's connection testing status and monitoring information.
For historical connection testing activity, including manual and automatic connection tests, see Test Connector AssetsTest Connector Assets.
Use Cases
Use Case 1: Onboarding a New Tenant
Scenario: A new tenant is added, and assets need to be configured for integration.
Steps:
- Create the tenant.
- Install the content needed.
- Navigate to Library > Configuration Manager.
- Add required assets (for example, API keys, and OAuth credentials).
- Verify configurations.
Result: The tenant is ready for use with correctly configured assets.
Use Case 2: Resolving Missing Configurations
Scenario: Assets display a Missing status due to incomplete details.
Steps:
- Locate the asset in the Configuration Manager.
- Edit and update missing fields.
- Save changes.
Result: The asset is marked Complete and operational.
Use Case 3: Managing Assets Across All Tenants (MSSP)
Scenario: A single solution or playbook is deployed across all tenants, and the asset requires an update to a new version (for example, updating the URL to V2). Administrators need a way to perform bulk editing from a central manager to ensure uniform updates.
Steps:
- Navigate to Configuration Manager.
- Select the Bulk Edit option from the menu.
- Filter assets by:
- Asset type
- Select the assets requiring updates across all tenants.
- Input the new details (for example, replace the URL with the V2 version).
- Review the changes and confirm updates.
- Save the changes to apply them across all selected assets and tenants.
Result:
- The updated assets are marked with the V2 configuration.
- The changes are applied consistently across all tenants, ensuring operational consistency.
FAQs
- Why can’t I create an asset?
- Reason: Assets are tenant-specific. If no tenants exist, the Create Asset button will be disabled.
- Solution: Add a new tenant via the Create Tenant button.
- What if my required connector isn’t installed?
- Navigate to the Connector Library and use the Find Connectors option to install the required connector.
- Can I modify an asset after creating it?
- Yes, click Edit next to the asset to update its details.
- What happens if an asset configuration fails?
- The system displays an error dialog with details. Resolve the issue and retry.
Tips and Best Practices
- Use Descriptive Names: Name assets clearly for easier identification.
- Leverage Filters: Use search and filters to locate assets quickly.
- Regular Updates: Periodically review and update assets to prevent errors.